So you want to build a web app. You have an idea, a laptop, and a quiet suspicion that "developers" are a secret society who speak in symbols and never sleep.
Good news: that was true in 2015. It is not true now. Today you can describe what you want in plain English, let an AI write the code, look at the result in your browser, and ship the whole thing to a real link on the internet — for free — in an afternoon.
This guide assumes you have never opened a terminal and never run a business. We'll go A to Z: what a web app even is, the handful of free tools you need, how to talk to an AI so it actually helps, and how to put your creation online where real humans can use it. No prior knowledge. No gatekeeping. A few jokes to keep you awake.
Let's build the thing.
What is a web app, really?
A "web app" is just a website that does something — not only shows you words and pictures, but reacts: you click, type, log in, save, get an answer. Instagram is a web app. A to-do list is a web app. The little tool that grades your stack is a web app.
Under the hood, every web app has the same four parts. The easiest way to understand them is to imagine a restaurant.
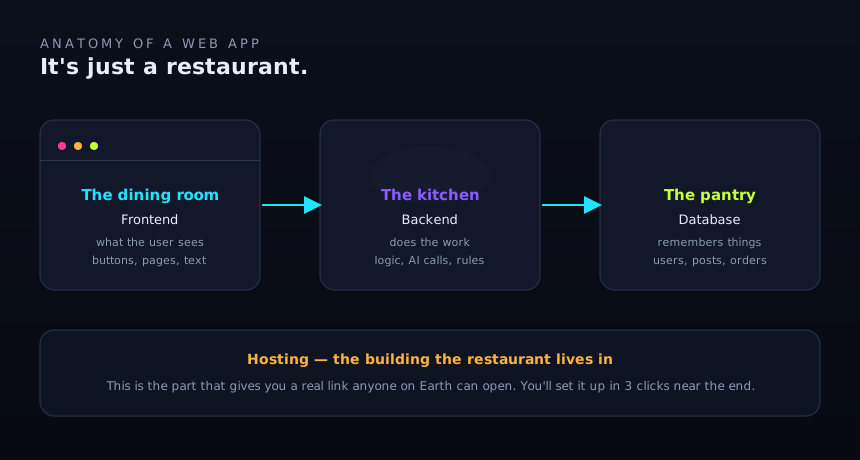
- The frontend is the dining room — what the user sees and touches. Buttons, text, colors, the menu.
- The backend is the kitchen — it does the actual work the customer never sees. It runs the logic, talks to AI, decides what's allowed.
- The database is the pantry — it remembers things between visits. Users, posts, orders, your high score.
- Hosting is the building the restaurant lives in — the part that gives you a real address (a link) anyone on Earth can walk into.
Here's the liberating part: with modern tools, one project folder contains all four, and the AI fills most of them in for you. You don't need to "become a backend engineer." You need to be the owner who knows what good service looks like.
New words flying at you? Boostor keeps a plain-English builder glossary — open it in a second tab and look up anything that sounds like a spell.
The mindset shift: you're the director, not the typist
The single biggest shift for beginners is this: you are not going to memorize code. You are going to direct an AI that already knows it.
Think of yourself as a film director. You don't operate the camera, hold the boom mic, and act in every scene. You say "give me this shot, warmer light, a little faster" — and skilled people make it happen. AI coding tools are your crew. Your job is taste and clarity, not syntax.
This means two skills matter more than anything technical:
- Describing what you want clearly (the AI is extremely literal — it's a genie that grants exactly the wish, commas and all).
- Looking at the result and knowing whether it's right. You already have this. You've used apps your whole life. You know when something feels broken or ugly.
Everything below is just the mechanics of that loop.
What you'll need (all free to start)
Before we build, let's get your kitchen stocked. Every item here has a free tier. You do not need to enter a credit card to follow this guide.
| Tool | What it's for | Cost | | --- | --- | --- | | A computer + browser | You already have this | Free | | Node.js | The engine that runs your app on your computer | Free | | A code editor (VS Code or Cursor) | Where the code lives; Cursor has AI built in | Free | | An AI coding assistant | Writes and edits the code for you | Free tier | | A GitHub account | A safe online backup of your work | Free | | A Vercel account | Puts your app on the real internet | Free |
That's the whole shopping list. Six things, six free tiers. Take a breath — you're more prepared than you think.
Meet the terminal (and why it's not scary)
The terminal is a black window where you type commands instead of clicking buttons. People act like it's the cockpit of a fighter jet. It's closer to texting a very literal robot that lives inside your computer.
You type a line, press Enter, it does the thing. That's it.
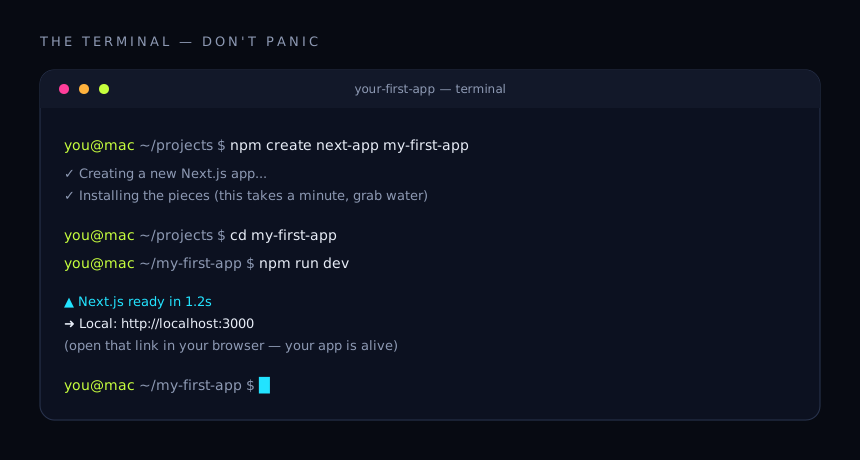
You will realistically only ever need a handful of commands. Here are the ones that cover 95% of your first month:
# move into a folder
cd my-first-app

# list what's inside the current folder
ls

# install the project's pieces
npm install

# run your app locally so you can see it
npm run dev
Two rules that will save you hours:
- Read the last few lines. When something goes wrong, the answer is almost always in the final red message, not the wall of text above it.
- Copy the error, paste it to your AI. "I ran this and got this error, what do I do?" is the most useful sentence in software.
That's the terminal demystified. You can stop bracing now.
Step 1 — Install the basics
Do these once and never again. Take it slow; there's no prize for rushing.
- Install Node.js. Go to the official Node.js website and download the "LTS" version (LTS just means "the stable, boring, reliable one" — exactly what you want). Run the installer, click through it like any app.
- Install your editor. Download Cursor (an editor with an AI assistant baked in) or VS Code. For a first-timer, Cursor is friendlier because you can chat with the AI right next to your code.
- Pick your AI coding assistant. If you're in Cursor, it's already there. If you want the most capable option, Claude Code runs in your terminal and is excellent at building whole features from a description. Either is a fine start.
To confirm Node installed correctly, open your terminal and type:
node --version
If it prints a number like v22.x.x, you're in business. If it says "command not found," restart your terminal and try again (turning it off and on again is, genuinely, half of all technical fixes).
Step 2 — Choose an idea small enough to actually finish
Beginners almost always pick something too big ("a social network for dogs with live video"). Your first app should be finishable in a day so you get the dopamine of a real launch. Ambition later; momentum now.
Great first apps:
- A tip calculator or unit converter.
- A personal link page (your own Linktree).
- A "random idea" generator for a hobby.
- A simple AI tool: paste text in, get a summary or a rewrite out.
The test: can you describe it in one sentence? "An app where you paste a paragraph and it gives you three catchy headlines." Perfect. That sentence is your first prompt.
Building something you hope to sell one day? Read Validate Your AI Startup Idea Before You Vibe Code It first — it'll save you from building something nobody wants.
Step 3 — Spin up your project
This is the magic moment. One command creates an entire working app — frontend, backend, and all the wiring — preconfigured. In your terminal, type:
npm create next-app@latest my-first-app
It'll ask you a few questions (TypeScript? Tailwind? App Router?). For a beginner, press Enter to accept the defaults every time. The defaults are sensible and you can change them later.
When it finishes, run these two lines:
cd my-first-app
npm run dev
Now open http://localhost:3000 in your browser. You will see a real, running app. You made that. It's living only on your computer for now (that's what "localhost" means — local to you), but it's real software running in a real browser.
Quick tour of what got created, in plain English:
- The
app/folder is your pages — what people see. package.jsonis the ingredients list of your project.public/holds images and files.- You will rarely touch anything else at first. Don't let the file count intimidate you; you live in maybe three of them.
Step 4 — Build with AI (the loop that does everything)
Here's the rhythm you'll repeat for the rest of your building life. It's four steps, and you already understand all of them.
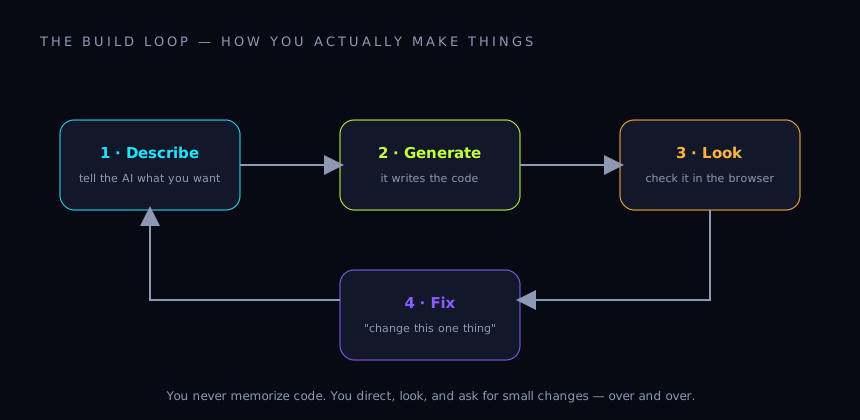
Describe → Generate → Look → Fix. Forever.
The whole skill is in how you describe. Vague prompts get vague apps. Compare:
- 🚫 "Make it a headline tool." (The genie shrugs.)
- ✅ "On the home page, add a big text box and a button that says 'Generate headlines.' When I paste a paragraph and click it, show three punchy headline options below the box. Keep the dark theme."
The second one tells the AI the layout, the trigger, the output, and the style. Be that specific. When something's off, don't start over — ask for one small change at a time:
- "The button is too small, make it full-width."
- "Add a loading spinner while it thinks."
- "The headlines are boring — make them punchier and shorter."
A few beginner-saving habits:
- Change one thing, then look. If you ask for ten changes at once and it breaks, you won't know which one did it.
- When it errors, paste the error to the AI. Don't try to read code you don't know — let the tool that wrote it debug it.
- Save your work often (more on that in Step 7).
Want to go faster? Boostor's Skills Factory turns a plain-English description into a reusable, production-ready skill your AI assistant can run on command — so your prompts get sharper every week instead of starting from scratch.
Step 5 — Make it look good (without being a designer)
You don't need a design degree. You need a few cheats that make almost anything look intentional:
- Pick one accent color and use it for every button and link. Consistency reads as "designed."
- Give things room to breathe. Tell the AI "add more padding and spacing" — cramped is the #1 amateur tell.
- Use one font for headings, one for body. Don't mix five.
- Dark background, light text is forgiving and looks modern (it's why this very page uses it).
A prompt that works wonders: "Make this look clean and modern — generous spacing, one cyan accent color, rounded corners, subtle hover effects on buttons." Then look, and nudge.
Step 6 — Add the "smart" part (optional but fun)
If your app does something with AI — summarizing, rewriting, answering — you'll connect it to an AI model with a key (think of it as a password that lets your app borrow a brain). Your AI assistant can wire this up; you mostly just paste the key into a special file called .env.local.
The one rule that matters here, in bold because people learn it the hard way: never share or post your keys publicly. They're like your house key with your address written on it. Your AI assistant knows how to keep them safe — ask it to "store the API key in an environment variable, not in the code."
Step 7 — Save your work with GitHub
Imagine writing a novel with no "undo" and no backup. Terrifying. GitHub is your undo button and your backup, combined. It saves snapshots of your project so you can always go back, and it's the bridge to putting your app online.
Create a free GitHub account, then let your AI assistant do the setup — "help me put this project on GitHub" — and it'll walk you through it. The three commands you'll see repeatedly:
git add .
git commit -m "describe what changed"
git push
In English: grab my changes, label this snapshot, send it to the cloud. You'll do this every time you finish something that works. It feels like saving a checkpoint in a video game, because it basically is.
Step 8 — Put it on the internet (the launch)
This is the part that feels like magic and takes about three minutes. You'll use Vercel, which is free and made for exactly this.
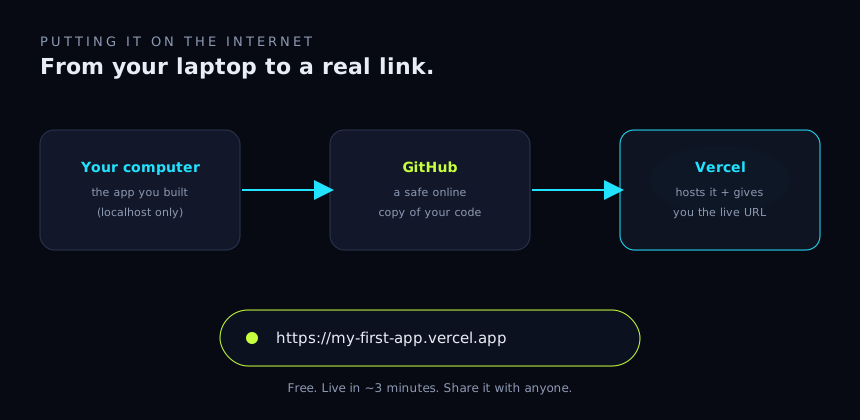
The flow:
- Create a free Vercel account and choose "Continue with GitHub."
- Click "Add New Project" and pick the repository you just pushed.
- Press Deploy. Leave every setting on its default.
Wait a minute or two, and Vercel hands you a real link like https://my-first-app.vercel.app. Open it on your phone. Text it to a friend. That link works for anyone, anywhere. You are, officially and unironically, shipping software.
Every time you git push a change from now on, Vercel automatically updates your live site. You build, you push, the world sees it. That's the whole loop of being a builder.
Want a custom domain like
mycoolapp.com? You can add one in Vercel's settings in a few clicks. Grab the domain from any registrar — that's the one part that costs a little money (usually ~$10/year).
Step 9 — Test it like a real human
Before you tell the world, click around like a confused first-time user (because your users will be exactly that):
- Open it on your phone, not just your laptop.
- Try to break it — leave the box empty and click the button. Type nonsense.
- Ask a friend to use it without instructions and watch where they get stuck. (This is humbling and gold.)
For each broken thing, you know the move: describe the problem to your AI, look, fix. The loop never changes; only the app gets better.
Step 10 — Share it and get your first users
A launched app with zero users is a tree falling in an empty forest. Getting your first ten humans is its own small craft:
- Post it where your kind of person already hangs out (a subreddit, a Discord, a group chat).
- Lead with the problem it solves, not the tech you used. Nobody cares that it's "built with Next.js." They care that it "writes their headlines in five seconds."
- Ask one blunt question: "Would you actually use this? Why or why not?" The answers are your roadmap.
Curious how your toolkit stacks up against other builders'? Run it through Rank My Stack — paste what you used and get a score for velocity, cost, and moat.
Don't fear the red text: reading errors
Errors are not the app yelling at you. They're the app telling you exactly where it tripped. Three beginner truths:
- Red ≠ broken forever. It's a note, not a verdict.
- The useful line is usually the last one, and often it names a file and a line number — the scene of the crime.
- Your AI is a debugger. Copy the whole error, paste it, add "what does this mean and how do I fix it?" You'll be amazed how often the answer is one line.
The builders who make it aren't the ones who never see errors. They're the ones who stopped flinching at them.
What to learn next
You just did the hard part — the first one. To compound from here:
- Build three more tiny apps. Range beats depth early. Each one teaches a new piece almost by accident.
- Learn to prompt better, deliberately. Sharper instructions are the most valuable skill you have. Boostor's Suite and the ranked skills directory are built for exactly this.
- Add one "real" feature each time: user logins, saving data, payments. You'll find the AI handles each one if you describe it clearly.
You don't need permission, a degree, or a secret handshake. You need an idea small enough to finish and the willingness to run the loop. The terminal was never the gate. It was just a door you hadn't opened yet.
Now go build the thing — and when it's live, send yourself the link. You earned it.
FAQ
Do I need to know how to code to build a web app?
No. With modern AI coding tools you describe what you want in plain English and the AI writes the code. Your job is to be clear about what you want and to look at the result and judge whether it's right — skills you already have from using apps your whole life.
How long does it take to build my first web app?
A small, focused first app (a calculator, a link page, a simple AI tool) can be built and put online in a single afternoon. Bigger ideas take longer, which is exactly why your first project should be small enough to finish in a day.
Is it really free to build and launch a web app?
Yes, to start. Node.js, VS Code or Cursor, GitHub, and Vercel all have free tiers that are enough to build and publicly launch your first app. The only thing that costs a little money is an optional custom domain name (around $10/year), and AI usage beyond the free tier.
What is a terminal and do I have to use it?
The terminal is a window where you type short commands instead of clicking buttons. You only need a handful of commands to start, and your AI assistant can guide you through each one. Think of it as texting a very literal robot inside your computer — type a line, press Enter, it does the thing.
What's the difference between the frontend, backend, and database?
The frontend is what users see and click (the dining room), the backend does the work users don't see (the kitchen), and the database remembers information between visits (the pantry). Modern starter projects include all three in one folder, and the AI fills most of it in for you.
What should I build as my very first web app?
Pick something you can describe in one sentence and finish in a day: a tip calculator, a personal link page, a random-idea generator, or a simple AI tool that takes text in and gives an answer out. Momentum matters more than ambition for your first build.